November 04, 2010
By MIlos Cihelka
Print Recipe
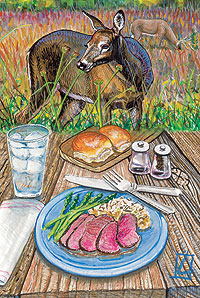
Follow these field-care tips to the best wild game dinners you've ever had.
By MIlos Cihelka
Photography: John "Lefty" Wilson
Advertisement
|
Advertisement
Many people don't like to eat game meat, mostly due to the fact that they never had it prepared properly. I've had friends tell me, "When I bring home a deer, my wife wants nothing to do with it. She won't cook it or eat it. Yet, when we come to your restaurant, she orders venison and loves it! Why is that?"
The reason, I would assume, is that he takes his deer to a processor to have it butchered. I cannot blame his wife. I wouldn't want to eat that venison either.
If you think that processing your own deer is too difficult, it isn't. I recently met a man who told me his nine-year-old son processed their deer, unassisted, following instructions in my Big Game: Field to Table video in his garage. If a nine-year-old can do it, then so can you!
To enjoy great-tasting venison, you need to follow these simple steps:
1. The deer should be properly field-dressed as soon as possible after the kill, and then drained.
2. The deer should be hung to age it.
3. After aging, it should be skinned and de-boned.
4. It is best to freeze it in the largest chunks that you can handle later.
Field-Dressing and Care
Lay the deer on its side. Using a hunting knife with a five-inch blade, cut around the rectum by pushing the blade straight in and, using a sawing motion, detach the colon. If it is a buck, remove the sex organs.
Lay the deer on its back, push the point of the knife in at the sternum (edge of rib cage).
Make an opening large enough to insert your index and middle fingers, without cutting any innards. Place the knife between your fingers, with the edge of the blade turned up.
Carefully slide your fingers under and ahead of the knife to prevent it from cutting into the stomach and intestines. Open the cavity down to the pelvic bridge, but do not cut the hind legs apart. If your knife has a gut hook, use it instead of the blade to open the cavity.
For a right-handed person, lay the deer on its right side. Open it and detach the upper part of the diaphragm. With your left hand, reach as far into the chest as possible and grasp the trachea and the esophagus at the neck. Carefully bring up the knife in your right hand and cut through the two tubes above your left hand.
Pull all the innards out and detach the bottom part of the diaphragm. Remove any chunks of loose fat. Inspect the entire cavity, including the vent, to be sure it is clean.
Check under the pelvic bridge to be sure the bladder is removed. Then turn the deer with the opening down and spread all four legs to drain the cavity of blood.
At this point you may separate and save the liver, heart, and kidneys, placing them in a plastic bag. If you forgot the bag, cut a slender stick about 14-16 inches long, push it through the liver and heart, and wedge it back inside the deer for transportation.
If the stomach and intestines have not been damaged and contents spilled, you need not wash the cavity. Otherwise, flush it with clean water and then hang the deer in a breezy place, head up, to drain for one day.
To cool a deer in warm weather, you may place bags of ice in the body cavity, but do not let the ice or run-off water contact the meat.
In warm weather, the carcass will attract a lot of flies. An application of "hot oil" will help. To make hot oil, put two cups of vegetable oil into a saucepan on the stove. Add a handful of crushed red pepper. When it begins to sizzle, remove it from the stove to cool, and then store it in a jar.
To use the hot oil, make sure the deer cavity is dry; otherwise, wipe it dry with paper towels. Spill a little oil on the palm of your hand and smear it over all exposed flesh, including the nose, mouth, vent, and shot holes. Do NOT coat the pelt. The oil will not affect the taste of the venison.
Transportation
If the roads are very dusty, or if it rains hard, you may want to wrap your deer in plastic for the short trip home. The carcass must be well-chilled first, and never keep it wrapped for more than a few hours.
Why Age a Deer?
Deer and other game, if frozen fresh, will be tough and strong-tasting. The rigor mortis needs to relax. During aging, the enzymes naturally present in all meat gradually break down fibers. As in wine, which is not fit to drink when first made, aging also mellows the flavor of game.
The optimum temperature for aging is 38-40 degrees F. Higher temperature speeds up aging; lower temperature slows it down. Without refrigeration, deer harvested in early bow season are often difficult to keep safely much longer than three days. On the other hand, we may have a problem keeping a deer shot in December from freezing. So what do we do?
I age my deer in the garage. It is important to have some ventilation. Hang the deer head down, placing a stack of newspapers under it to collect drainage. Put a stick in the body cavity to keep it open. Note: Check the cavity every day or two to make sure it remains dry. If any slime develops, wipe it off with a towel soaked in vinegar. It should dry again in one day.
If the daytime temperature rises to 50 degrees F or drops at night to 28 degrees F, there is nothing to be concerned about. However, if it gets over 50 or below 28, then we have to make some changes. If you see fly eggs on the carcass (in moist places such as the neck opening), you will have to skin and butcher the deer soon. In freezing weather, I have placed a small electric heater close to the deer and wrapped a tarp around it to make a kind of tent.
During the firearms season, when there is no more problem with flies, I hang a young deer for two to three weeks, a mature deer three to four weeks. During the second week, small white specks of mold will appear on the exposed surfaces. This is a natural
occurrence and nothing to be concerned with, as long as the surface stays dry to the touch.
Skinning
Make sure the rafters are solid and you have strong rope holding the deer up. Slit the skin on all four legs from the opening to the elbows; then slit the neck skin to the chin. With your hands (I don't use a knife), peel the skin off the hind legs and cut it off at the knees.
Then pull it down to the waist of the deer, removing the tail. Loosen the skin from the flanks of the belly.
Using a slipknot, attach a strong rope to the loose skin. Attach the other end of rope to a vehicle and let someone slowly back it out of the garage. Stand to one side and watch that the meat does not pull off with the skin. When the skin reaches the head, stop the car and cut the hide off at the ears and front legs.
Preserving the Hide
Spread it on the floor, hair down. Sprinkle about three pounds of granular salt over it, pushing the salt into all of the wrinkles and edges. Repeat if necessary and let the hide cure about four to seven days, or until the water has dried. Then fold the sides to the center and roll it up. It is now ready to be shipped to a tannery.
Breaking Down a Deer
Using a bone saw, cut off the front legs at the elbows. To remove the head, use a knife.
Cut through the neck muscles just below the head, all the way to the bone. Then tilt the head forcibly backwards to snap the spine. Twist sideways. Cut the rest of the connective tissue. Cut off the front shoulders with a knife, starting at the armpit and using your other hand to twist the leg away from the body. Next, cut the flanks and ribs off. To do this, take your knife and make a horizontal cut through the flank, below the hind leg, to about 3½ inches from the spine. Then cut straight down, parallel with the spine to the rib cage.
Use a saw to cut all the way down through the ribs.
Use the saw to cut the neck off at the fourth vertebra from the bottom of the chest. Saw the saddle (loins with bone) off at the second vertebra from the hind legs. Split the hind legs, sawing straight down between them. Saw the hind legs off at the knees. The deer is broken down now, and you may continue butchering inside the house.
Boning the Hind Legs
There are three different types of muscles in the hind legs, each suited for different preparations. If the legs are frozen whole and then cut crossways with a band saw as the processor does, each slice will contain all three types of muscles -- plus sinews and veins -- and is unsuitable for any satisfactory preparation. Besides, freezing the meat with the bone in assures that the bone will soon turn rancid, and this odor will permeate the meat.
For these reasons, the legs should be boned-out and the muscles separated.
Freezing the Venison
If the meat is to be frozen, it is best not to trim the surface sinews, as they will protect the meat from freezer damage. It is best to freeze as big chunks of meat and trim them later, before cooking. The smaller the cuts, the more vulnerable they are to freezer damage. For hamburger, freeze the pieces whole, to be trimmed and ground after thawing. Make sure all air is expelled from the package when wrapping it up. Use plastic first, and then paper.
Be sure to write the description and date of the cut on the package, and the next time you see the meat you can be confident that it will make for a delectable meal.
The author is a Gold Medal Certified Master Chef from Bloomfield Hills, Michigan.
